Crypto Grid Bot Settings 2026: Range, Grids, Spacing & Risk
Crypto grid bot settings determine where a grid strategy trades, how densely orders are placed, how much capital each level receives, and what happens when price leaves the planned range. The core variables are the lower price, upper price, number of grid intervals, spacing method, capital allocation, fees, and exit rules. A grid bot can automate order placement, but weak parameters can still create poor capital efficiency, fee drag, inventory risk, or an uncontrolled exit.
Affiliate Disclosure: TradeboticsAI may receive compensation when readers complete qualifying actions through selected links. Affiliate relationships do not determine our analysis. Crypto assets and automated trading involve substantial risk, and no bot or parameter set guarantees profit.

Crypto Grid Bot Settings Overview
The best way to understand crypto grid bot settings is as one linked system rather than a collection of independent switches. The range defines the operating zone. The number of intervals divides that zone. The spacing determines how far price must move before the next grid level is reached. Capital determines order size. Fees and slippage determine whether the gross spread is large enough to leave a positive margin after execution costs.
| Setting | What It Controls | Main Failure Mode |
|---|---|---|
| Lower / upper price | Where the bot is active | Price exits the range too quickly |
| Grid count | How many intervals divide the range | Too many small orders or too few trading opportunities |
| Spacing | Distance between grid levels | Gross spread becomes too small relative to fees |
| Capital | Total exposure and size per level | Over-allocation to one automated strategy |
| Arithmetic / geometric | How grid levels are distributed | Using a spacing model that poorly matches a wide price range |
| Stop loss / take profit | When the bot exits | No predefined response to a range failure |
| Trailing | Whether the grid can move with price | Changing exposure during a directional move without a clear plan |
Because crypto grid bot settings interact, change one variable at a time when comparing configurations. Save each version so the effect of a wider range, different grid count, or new fee assumption can be measured rather than guessed.
Official documentation from OKX describes price range, grid quantity and grid mode as core spot-grid parameters. Pionex similarly documents lower and upper prices, grid count, investment and risk controls. These details vary by platform, so always confirm the live order panel before launching a bot.
1. Set the Price Range Before the Grid Count
Among all crypto grid bot settings, the lower and upper bounds usually have the largest structural impact. A grid strategy is designed to work inside a chosen price zone. If price repeatedly oscillates inside that zone, the bot may have multiple opportunities to complete buy-and-sell cycles. If price moves decisively outside the range, normal grid activity may pause, change inventory composition, or trigger an exit depending on the platform and advanced settings.
Good crypto grid bot settings begin with a range thesis that can be invalidated. A practical range process starts with observable market structure rather than a desired return. Identify the period you intend to trade, mark the relevant high and low, measure how often price has respected those boundaries, and check whether current volatility makes the range unrealistically narrow. The range should express a testable market assumption: price is expected to rotate inside this zone often enough for the strategy to operate.

If you want a dedicated analysis of what happens when the lower boundary fails, use our Crypto Grid Bot Stop Loss guide.
2. Choose the Number of Grids After Defining the Range
The next major crypto grid bot settings decision is grid count. More intervals generally place levels closer together, increasing potential fill frequency while reducing gross movement between adjacent levels. Fewer intervals create wider spacing, meaning price must move farther before crossing the next level.
This creates a three-way trade-off between trade frequency, gross profit per completed interval, and execution costs. The correct grid count therefore cannot be chosen independently of range width and fees. A setting of 50 grids can be reasonable in one range and unusable in another.
| Configuration | Likely Effect | What to Check |
|---|---|---|
| More grids in the same range | Tighter spacing and smaller gross movement per interval | Fees, minimum order size and fill quality |
| Fewer grids in the same range | Wider spacing and fewer potential crossings | Whether normal volatility is large enough to reach adjacent levels |
| Wider range with same grid count | Wider spacing | Capital use and reduced trade frequency |
| Narrower range with same grid count | Tighter spacing | Breakout frequency and fee drag |
3. Calculate Grid Spacing Instead of Guessing
For crypto grid bot settings to be testable, spacing should be calculated explicitly. One complication is that platforms do not always use identical terminology: some interfaces count intervals while others describe the number of grid levels. The formulas below define N as the number of intervals between the lower and upper bounds.
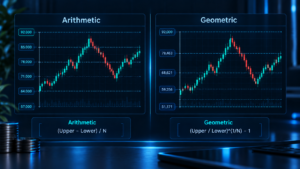
Arithmetic Grid Formula
Arithmetic spacing = (Upper Price − Lower Price) ÷ N
Example: lower price $80,000, upper price $100,000, 20 intervals. The arithmetic spacing is $1,000 per interval. The absolute price difference stays constant, while the percentage difference changes slightly as price rises.
Geometric Grid Formula
Geometric spacing rate = (Upper Price ÷ Lower Price)1/N − 1
Using geometric spacing, each adjacent level is separated by approximately the same percentage rather than the same dollar amount. This can be easier to reason about across wide price bands because the relative movement remains more consistent.
Our dedicated Arithmetic vs Geometric Grid guide covers the difference in depth.
4. Set Capital Per Grid and Check Minimum Order Size
Capital allocation is one of the most underestimated crypto grid bot settings. A bot may show a valid range and grid count but still require enough capital for every planned order to satisfy the exchange’s minimum order rules. The exact allocation algorithm depends on the platform, current price and whether the strategy starts with both base and quote assets.
A simple planning estimate is:
Approximate capital per interval = Allocated Capital ÷ Number of Active Intervals
This is not a universal execution formula. It is a pre-launch sanity check. The platform may distribute funds differently, reserve inventory, or calculate a minimum investment dynamically. Confirm the actual order sizes in the bot preview.
5. Check Fees Before You Finalize the Grid Count
A crypto grid bot settings plan is incomplete without fees. Every completed grid cycle requires enough gross price movement to overcome applicable trading costs and execution friction. If the same percentage fee applies to both sides, a rough planning estimate is:
Approximate round-trip trading fee = Entry fee % + Exit fee %
For example, if entry and exit each cost 0.10%, the simplified round-trip trading fee is about 0.20% before slippage, spread, funding, subscription costs, taxes or other platform-specific charges. A 0.15% gross grid movement would therefore be structurally too small to cover that simplified 0.20% trading-cost estimate.
Do not hard-code one exchange fee into your strategy. Fee tiers, maker/taker status, promotions and product types can change. Use our full Crypto Grid Bot Fees guide when calculating net economics.
6. Define Stop Loss, Take Profit and Trailing Before Launch
Risk controls are not optional afterthoughts to crypto grid bot settings. They define what the bot should do when the original range thesis stops being valid. Bitsgap’s official GRID documentation lists stop loss, take profit and trailing functions among its advanced controls, while other platforms implement similar concepts with different rules and limits.
A useful pre-launch decision tree is:
- Below the range: hold the base asset, stop the bot, or close under a predefined stop rule?
- Above the range: stay in quote currency, stop, or allow the range to trail upward?
- Profit target reached: continue harvesting the range or terminate the strategy?
- Volatility regime changes: keep the same parameters, pause, or build a new configuration and retest it?
Trailing features deserve special attention. They can move the operating range with price, but that means the strategy is no longer behaving exactly like a fixed grid. The change should be understood before activation, especially on leveraged futures grids.
Crypto Grid Bot Settings Calculator
Use this crypto grid bot settings calculator before copying parameters into a live order panel. It turns the main crypto grid bot settings into measurable outputs. It estimates arithmetic spacing, geometric spacing, approximate capital per interval, and a simplified fee-adjusted spread. It is an educational planning tool, not a profit forecast.
Calculator assumptions: N means intervals, not platform-specific grid labels. Capital per interval is a rough planning estimate. Fee-adjusted spacing subtracts two equal fee rates and ignores compounding, slippage, spread, funding, taxes and platform-specific execution logic.

A Repeatable Crypto Grid Bot Settings Workflow
Before launch, save your crypto grid bot settings as a dated configuration record. A strong crypto grid bot settings workflow should be repeatable and documented. The goal is not to find a magical preset. The goal is to build a configuration that can be tested, compared and rejected when the evidence is weak.
- Choose a liquid pair. Thin markets can create larger spreads and less reliable fills.
- Define the intended holding period. A range selected from one timeframe may be inappropriate for a bot expected to run much longer.
- Identify lower and upper boundaries. Use actual market structure rather than arbitrary round numbers.
- Choose arithmetic or geometric spacing. Make the choice before finalizing the number of intervals.
- Calculate spacing. Quantify the absolute and percentage distance between levels.
- Insert current fees. Confirm maker/taker costs and any additional product charges.
- Check minimum order size. Make sure the allocated capital can support the planned ladder.
- Define invalidation. Decide what happens if price leaves the range.
- Backtest or simulate. Compare the same strategy across different market regimes and include costs.
- Record the configuration. Save the date, pair, range, grid count, fee assumption, exit rules and test result so the setup can be audited later.
For users still deciding whether grid logic is appropriate at all, compare Grid Bot vs DCA Bot. If you are comparing platforms, see our Best Crypto Grid Trading Bots 2026 research.
Common Crypto Grid Bot Settings Mistakes
The most common crypto grid bot settings errors are not software failures. They are parameter-design failures.
Choosing the Grid Count First
Starting with “I want 100 grids” reverses the correct sequence. Range width, volatility and fees should determine whether 100 intervals make any sense.
Using a Range That Is Too Tight for Current Volatility
A bot that frequently sits outside its operating zone may be automated but inactive. The historical range should be compared with the market’s current volatility regime.
Ignoring the Difference Between Grid Profit and Total P&L
Realized gains from completed grid cycles do not automatically mean the entire strategy is profitable. The value of the remaining base asset, unrealized P&L, fees and exit price also matter.
Treating Backtest Profit as a Forecast
A historical test is evidence about one dataset, not a promise about the future. Test sensitivity to different ranges, start dates, fees and volatility conditions.
Adding Leverage to Fix Weak Economics
If a spot-grid configuration has poor spacing or weak fee-adjusted economics, leverage does not repair the underlying design. It changes risk, not the quality of the original parameter logic.

How Major Platforms Implement Grid Settings
The concepts behind crypto grid bot settings are similar across providers, but terminology and behavior can differ. That is why a generic formula should never replace the live product documentation.
| Platform | Documented Grid Controls | Important Detail |
|---|---|---|
| Bitsgap | Custom GRID settings, stop loss, take profit, trailing and backtest features | Advanced controls can change how a fixed grid behaves after price moves |
| Pionex | Lower/upper limits, grid count, investment, trigger, exit controls and grid mode | Outside-range behavior changes the composition of the bot’s holdings |
| OKX | Price range, grid quantity and arithmetic/geometric mode | More grids generally mean smaller intervals and more frequent executions |
| Bybit | Range, grid count and additional risk controls depending on bot type | Current product limits and features should be checked in the live interface |
Provider features can change after publication. Verify current settings through the official Bitsgap GRID Bot page, the official Pionex documentation and your exchange’s current bot interface.
Pros and Cons of Manual Grid Settings
| Pros | Cons |
|---|---|
| Parameters can be documented and tested | Requires understanding range, fees and inventory behavior |
| Risk rules can be defined before launch | Settings can become stale when volatility changes |
| Users can compare multiple configurations | Over-optimization can fit historical data too closely |
| Spacing economics are transparent | No parameter set removes market risk |
Best For / Not For
Best for: traders who understand that a grid is a range-based execution framework and want measurable, rule-based automation with documented parameters.
Not for: users looking for guaranteed passive income, anyone unwilling to monitor regime changes, or traders who do not understand what happens to inventory when price leaves the operating range.
Hidden Costs and Limitations
Even carefully designed crypto grid bot settings can underperform because the final result depends on more than grid spacing. Relevant costs can include maker/taker fees, bid-ask spread, slippage, funding on derivatives, subscriptions, conversion costs and taxes. Operational risks include API connectivity, exchange outages, order rejection and differences between backtest assumptions and live execution.
Crypto Grid Bot Settings FAQ
What are the most important crypto grid bot settings?
The most important crypto grid bot settings are the lower and upper price boundaries, grid count, spacing method, capital allocation, fee assumptions and exit rules. These variables interact, so changing one can alter the economics of the entire configuration.
How many grids should a crypto grid bot use?
There is no universal number. The grid count should be derived from the selected range, desired spacing, exchange minimum order size, fees and expected volatility. More grids are not automatically better.
How do I calculate grid spacing?
For N arithmetic intervals, spacing equals (Upper − Lower) ÷ N. For geometric intervals, the percentage step equals (Upper ÷ Lower)1/N − 1. Confirm how your platform defines “grids” versus “levels” before copying a formula into the order panel.
Should grid spacing be larger than trading fees?
Gross spacing must be large enough to cover applicable execution costs if a completed cycle is expected to have positive fee-adjusted economics. Trading fees are only one cost; spread, slippage, funding and other charges may also matter.
What happens when price goes below the grid range?
Behavior varies by platform and configuration. A spot grid may stop placing new grid orders while holding a large base-asset position, or an advanced stop rule may close the strategy. Read the provider’s current documentation and define the action before launch.
Are AI-recommended grid settings safe?
No preset or AI-generated configuration is inherently safe. Suggested settings are inputs for analysis, not guarantees. Review the range, spacing, fee assumptions, capital exposure and exit logic independently.
Should I use a spot grid or futures grid?
Spot and futures grids have different risk profiles. Futures grids can introduce leverage, liquidation and funding risk. Traders who do not specifically need derivatives exposure should not assume that a futures grid is simply a faster version of a spot grid.
Final Verdict
Crypto grid bot settings should be built in a fixed order: define the range, choose the spacing model, calculate the number of intervals, confirm fees and order size, set risk controls, then backtest or simulate the complete configuration. The strongest setup is not the one with the most grids or the highest historical return. It is the one whose assumptions, costs and failure conditions are explicit enough to test.
For platform selection, start with our Best Crypto Grid Trading Bots 2026 comparison. For strategy selection, compare Grid Bot vs DCA Bot. For execution economics, use the Crypto Grid Bot Fees guide before committing capital.
Affiliate & Risk Disclosure: TradeboticsAI may earn compensation from qualifying affiliate actions. This content is educational and does not constitute financial, investment, tax or legal advice. Crypto markets are volatile. Automated trading can produce losses, and historical or simulated results do not guarantee future performance.